How to take pictures of the Sun with a small telescope and a digital camera
You can do it with almost any telescope and any camera. You just need an adapter. And they make inexpensive adapters exactly for this purpose
Note: I also have a video tutorial for this at the bottom of the page.
It is pretty easy to do and I have a video tutorial for you at the bottom of the page. I will take you through teh complete process and do it. And with two differen types of cameras. You will just need to purchase some kind of adapter and in this tutorial I will show you what adapter to get depending on the camera you have. I also have links to them on amazon where you can buy them.
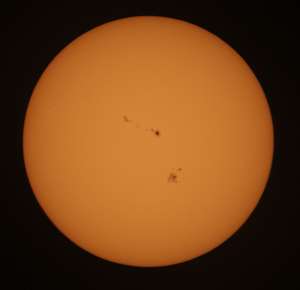
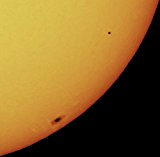
In this picture I took you can see some substantial sunspots on the surface of the sun.
Here on this page I give you an overview of what to do and a listing of the various items used.
There are two basic points when it comes to taking solar photos.
1. You have to protect everything from the sun. This means getting some kind of a solar filter that fits over the aperture of the telescope.
2. You need some kind of adapter to connect the camera to the telescope.
That’s pretty much the whole shooting match. Let’s do it!
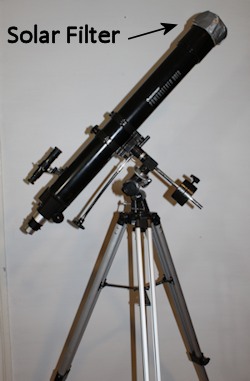
The first thing you need to do is mount a solar filter on the aperture of your telescope. It has to be on the aperture. Do not attempt to mount or use any kind of solar filter at the eyepiece.
Putting a filter at the eyepiece is not a safe practice. The telescope, in magnifying the sun, can easily burn right through the filter. So mount one on the aperture.
You can purchase premade filters that mount on telescopes. They are terrific but you have to be sure to get the right filter size for the particular telescope you have.
Optionally, and this is what we will do, you can make a filter for your telescope. You purchase a sheet of solar film and you make a housing for it that will mount on your telescope.
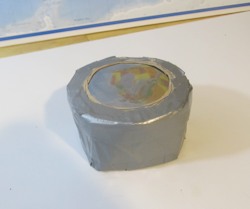
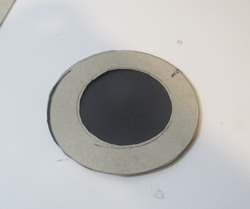
Here is the filter housing that I made and use on my telescope. You do have a whole lot of options as to how you make yours but let’s go through the steps to how I made mine.
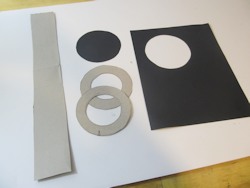
I created a couple of rings out of cereal box cardboard. And I cut a circle out of the solar film.
Then I sandwiched the film between the two cardboard rings.
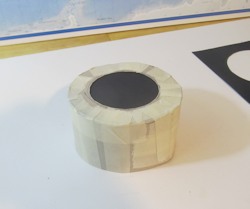
Then I wrapped a band of cardboard all the way around it and taped it all up nice and tight.
Test it on the telescope inside the house. Make sure it is firm and nothing leaks sunlight. It should be snug and not be at any risk of falling off when you move the telescope around. Put a rubber band on it if needed.
Couple of things to think about
Inspect the solar film. Make sure there are no pinholes or scratches in it. And, most solar films are directional. It will have a silver side and a dark side. The silver side is pointed toward the sun. The film you get will tell you this. The one I made with the masking tape is just a mockup. I didn’t use real solar filter for it. That’s why the film is black. Take a look at the one I use. It’s the one made with duct tape. You can see that the solar film is silvered.
The solar film comes in different sizes. Here is one on amazon:
3.75″ x 3.75″ Solar Filter Sheet for Telescopes, Binoculars and Cameras
I purchased a bigger one so I could make several different solar filters.
Okay! Let’s now move onto the camera set up! And how you take pictures!!
This tutorial is now broken down into two different halves depending on the type of digital camera you plan on using when taking pictures of the sun. Choose which kind of camera you have. And you can of course go through both tutorials.
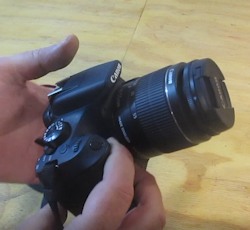
A DSLR camera of any brand- This is the more professsional kind of camera where you can replace out the lenses.
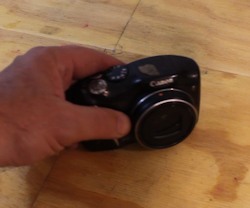
A common point and shoot digital camera of any brand.
The Tools and Items in this tutorial
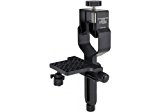
Celestron 93626 Universal Digital Camera Adapter (This is the exact one on amazon that the telescope nerd bought and uses in the video.)
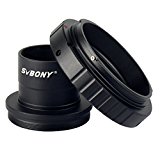
SVBONY T2 T Ring Adapter and T Adapter 1.25” Metal for All Canon EOS Standard EF Lenses and Telescope Microscope Camera Astrophotography Accessories (This is the exact one that the telescope nerd bought and uses in the video.
- t-ring and adapter for Canon
- t-ring and adapter for Pentax
- t-ring and adapter for Nikon
The pair of telescopes you see in the video are both Celestrons.
I own both these telescopes and love them :):
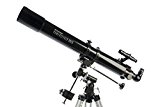
Celestron PowerSeeker 80EQ Telescope
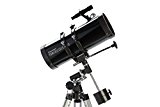
Celestron 127EQ PowerSeeker Telescope